Updated as of February 8, 2020
Are you an aspiring OFW? Or an aspiring local employee waiting for the complete set of requirements to be posted by the company you are applying to? Maybe you have plans to travel abroad and just enjoy a good summer vacation. Do you know that your visas won’t be approved if you lack government documents such as the National Bureau of Investigation Clearance or NBI Clearance? Pretty scary right? Now we don’t want any delay or trouble wit our documents and so we must comply especially with one of the most important government documents in our country. NBI Clearance is one of the most common requirements for us to prove our identity, and as its name suggests it clears us from doubts that we might have a pending criminal record that disqualifies us from any opportunities even in simple local employment.
NBI Clearance registration was not available online a couple of years ago. You have to go through long queues and some would even start lining as early as 4 am. Fortunately, we have now our online registration. This NBI clearance online registration system gets rid of the long queues, it secures your slot and you can even choose from AM or PM slot.
Steps on how to register online:
1. Go to the NBI website https://clearance.nbi.gov.ph/
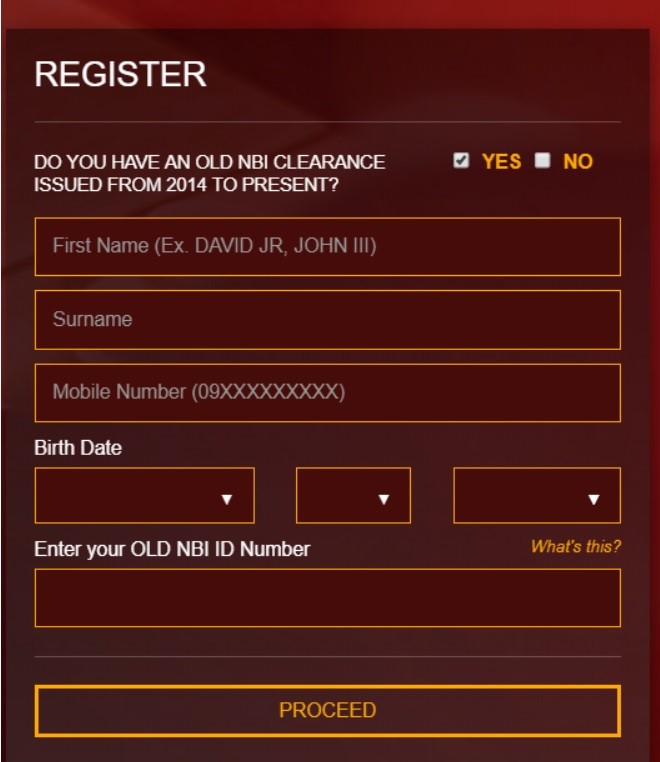
If you have an NBI clearance issued from 2014 up to present, click yes if not click no. Assuming that this is your first time to get an NBI clearance. So you will click No.

2. After you click No a new form will appear. It indicates “Register as New Account”. You need to fill out all the black spaces such as Gender, Civil Status, Birthdate, etc. then click sign up.

3. If you just need to renew and still have the old NBI ID number click “YES” then fill up the fields then click “Proceed” to go to the next page.
After filling out the form click on “Read and Accept Terms of Service” then click Sign up to proceed to the next page.
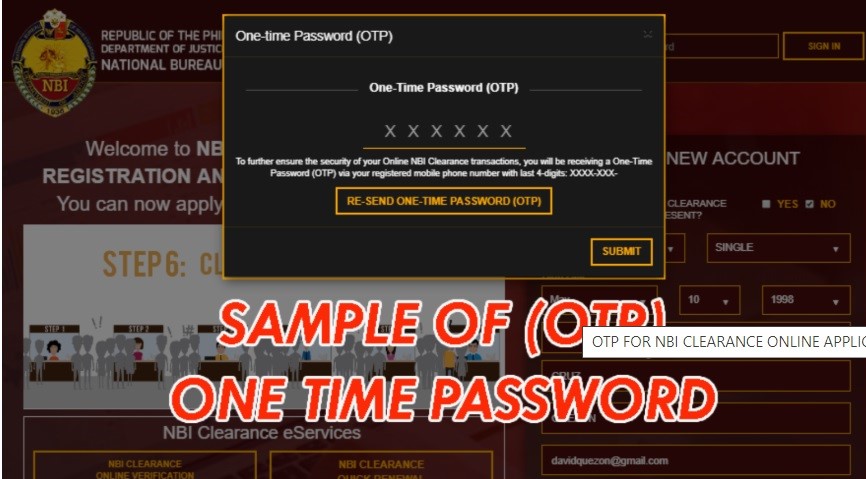
4. After clicking sign up, a new window will appear and will be asking for a One-time pin (OTP). Please take note that the mobile number or email add that you provide must be active. NBI now uses OTP to ensure that the person they are transacting with is real and not a robot. Input the OTP in the form for you to proceed to the next step.
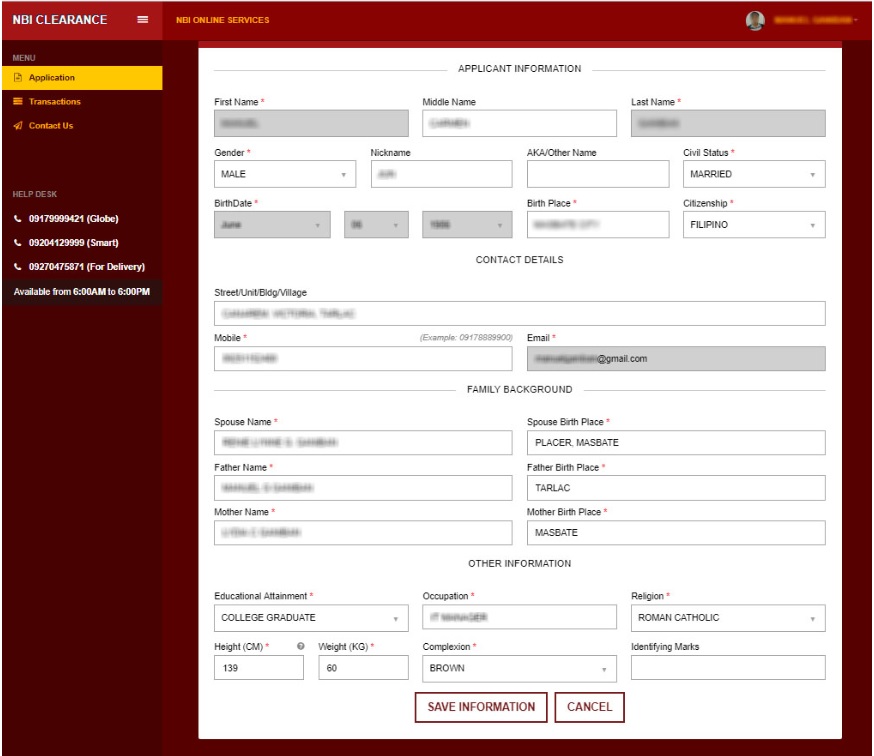
5. A new window appears. It needs the application information of the person such as First name, middle name, last name, etc. Fill out all the black spaces then click SAVE INFORMATION.
6. After you click the SAVE INFORMATION button, a summary of your information will appear. You need to review it carefully to see if you missed something or if there is any mistake. If there is a piece of wrong information then you can still click EDIT INFORMATION and correct it. After everything is finalized, click APPLY FOR CLEARANCE.

7. After Clicking the “APPLY FOR CLEARANCE”, the new windows will pop up and asking which Valid ID you’re presenting during your appointment. You can choose which one you have on the below:
- SSS ID
- PRC License
- Postal ID
- GSIS UMID
- Passport
- Voter’s ID
- Driver’s License
- Philhealth
- School ID
- Tax Identification Number (TIN) ID
- Senior Citizen Card
- NSO Authenticated Birth Certificate
- Copy of Previous NBI Clearance
- Alien Certificate of Registration
After providing or entering the valid ID you will be presenting, click the I Agree button.
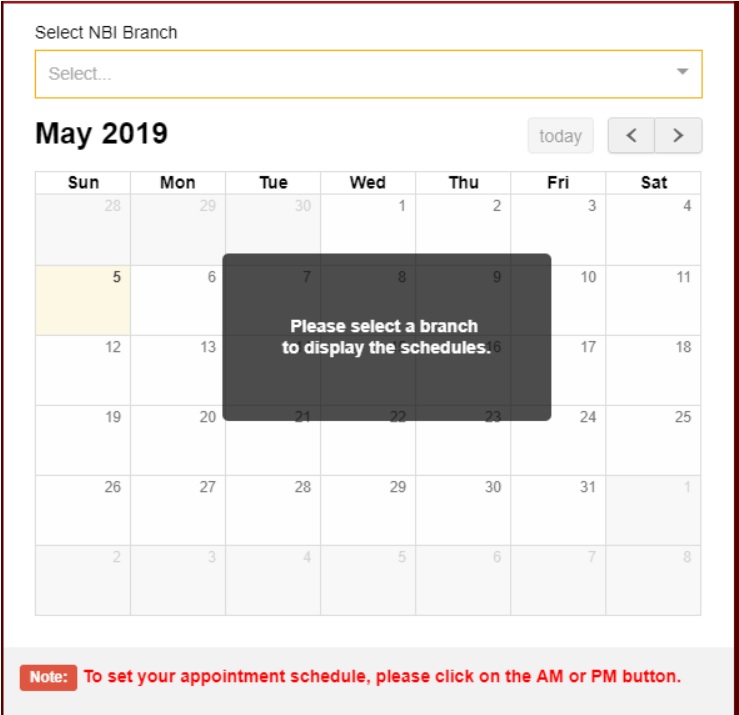
8. After clicking the I Agree button, a new page will be displayed for you to select an appointment. On this page, you may choose which NBI branch you want to request your clearance. After selecting the NBI Branch, you can now choose the Date and Time from AM or PM and depend on the available slots.
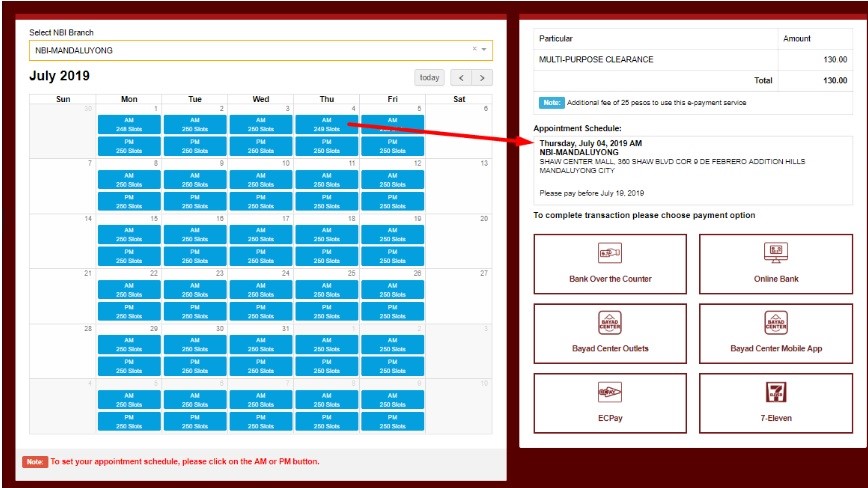
9. On the right side of the schedule screen, You can see the amount of your NBI Clearance, Appointment Schedule, and the different types of payment options. Choose your payment option. You can pay through any bank over the counter, online banking, 7-eleven, Bayad Center outlets, Bayad Center Mobile, and the ECPay. If you select Bayad Center or 7 Eleven a new window will appear that contains your reference number and total amount to be paid. take note of the reference number. The Bayad center or 7 eleven will require this number when you pay at their outlet.
Done paying the NBI Clearance on the selected payment option, now check the status of your NBI Clearance online and see if the status is changed from “PENDING” to “PAID”.
10. When the date assigned has come, you must go to the selected NBI branch and claim your certificate. Bring 2 valid ID’s, NBI Clearance Online Certificate Number, and NBI Clearance Online Receipt.
11. When at the NBI branch kindly approach the NBI personnel and tell them that you have an appointment so that they can assist in Biometrics and Photo Capture.
12. After the Biometrics and Photo capture, all you need to do is wait for the releasing of your NBI clearance.
Congratulations! You are done and you now have your NBI Clearance.
The steps were pretty easy, right? No long queues and hassle-free online service by NBI. We are living in a fast-changing world where every second matter. Every minute cannot be put to waste and so we must learn to adapt fast and easy ways to shorten the length of time needed to process certain documents. We need to eliminate time wasters and just proceed directly to the things that really matter. Processing a document can be demanding but there are ways to make it less of a burden to those who need it and to those who process it. Let us save time, energy, and money so we can move forward and be more progressive. – Karie | Helpline PH